Showing posts with label stash busting quilt. Show all posts

Friday, January 20, 2023

Pink- Project Quilting

 The theme this week, for Project Quilting, is PINK.  Pink is a color I have very little of because I love it and us it so there is none in my stash!  However, I have been hanging on to these tea cups and the flowery pink fabrics, not sure what to do.  

However, I have been under the weather for a few days and now that I look at my quilt top, I do not like the neutral fabric.  I am thinking of taking it apart and replacing it with white.  That will for sure mean I do not get it finished by Sunday's deadline for Project Quilting.  

When I do get around to finishing this piece, it will be a table top quilt, 
therefore it does not have a top/bottom.


Sunday, January 8, 2023

Project Quilting season 14

 Here is my entry for PQ with the theme of "one".  I call it "One Woman's Heart".  It is my first finish of the new year.  

Our hearts are so full of EVERYTHING...One woman carries around a lot of stuff in her one heart.  And it has been shattered and mended over and over again.  


If you look closely you will see the words I embroidered. (Memories, Faith, family, pride, worry, love, hope, gratitude, dreams, and prayer) I could have just kept adding words all night long but want to get a little bit of sleep before I head out to church in the morning so I had to stop.  
It was fun.  
I started this project at 10 am Saturday.  Stopped for 45 minutes to help my husband take down Christmas lights outside.  Then stopped for dinner (which my most wonderful husband made) and about 2 hours of comedy shows with my family.  Then my son called from Hawaii and I talked to him for about 45 minutes.  The rest of the time, I have been working on this.  It is now 1:14 am on Sunday.  

Here's hoping your heart is full of all the most wonderful things in this new year!


Friday, January 6, 2023

Friday Night With Friends and Rainbow Scrap Challenge


I spent a few minutes playing in my scrap bin tonight.  It went together really quickly.  I thought I was using scraps of sew-in stabilizer for the foundation but it turns out is was iron on.  So, my already deplorable ironing board cover for sure has to be changed now.  


This will also be my Rainbow Scrap Challenge for the year.  I will make each row the new color of the month.  This pattern is in the American Patchwork and Quilting Magazine for December 2022 and it is the only reason I purchased the magazine.  I love this in all blues so I may have to make an all blue version too!  

I will link this post to both Friday Night With Friends and Rainbow Scrap Challenge.  

Thursday, January 5, 2023

A Year of Stash Busting Quilts- Free Pattern and a Giveaway!


My major goals for 2023 are to focus on growing my blog and getting LOTS of quilting done, using my overgrown stash of fabrics!

So, I have decided that I am going to provide a free quilt pattern, here on my blog, every month this year.  It will be a pattern designed to use my stash, help teach beginners how to quilt, and offer ideas and projects that all quilters can use to make their quilting life easier.  

I will also TRY to offer a modest giveaway with each pattern.  

Look for patterns to be posted by the first Friday of each month.  

The January Giveaway:


For some reason, I have ended up with 3 of these lovely polar bear panels.  I know that one of them came from my sister when she went to Alaska.  She chose just the right one because it was one I had already selected for myself and had in my stash.   I think the third one arrived because I found the kit on sale and wanted more of the coordinating fabrics.  

I will be giving one of these panels away to go along with this quilt pattern.  

How to enter the drawing:  You will get one entry for each of the following:

  • Become a follower of this blog
  • Share a link to this post on your own blog
  • Show me a picture of a block you make from this pattern

That is up to 3 chances per quilter to win this lovely panel.  I will be adding entries to a numbered list in the order they are received and then will use a random number generator to find our one winner.  I will draw for the winner on Tuesday, January 31, 2023.  

All entries need to be received by Monday, January 30, 2023.   

The January Pattern: Polar Ice
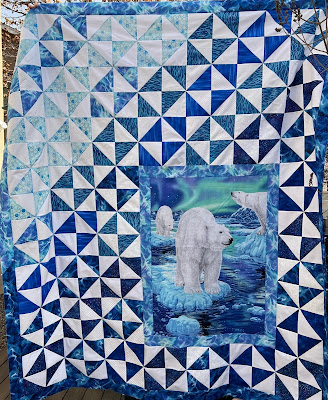
60 X 68 Inches

This quilt was designed to use stash fabrics and a panel you have been holding onto.  So, be creative, go with what you have! I can't wait to see... 

Yardage required:

1 panel of your choice- see trimming instructions below. 

2.5 yards of blue- a variety of scraps is fine as long as you can get two 5 inch squares from each scrap.

1.5 yards of white- again scraps are fine as long as you can get at least two 5 inch squares from each piece. 

Binding will require approximately 20 inches by WOF.

Backing will require approximately 3 yards of fabric.

A Cutting Chart is provided at the end of the pattern.    

Note: The panel I used had to be trimmed down.  I wanted multiples of 8 (8 inch blocks) so I decided I would trim it down to fit an area measuring 24 inches by 32 inches finished.  I also wanted a border on my panel so I had to subtract that from my panel size. 

Trim panel to 20.5 inches by 28.5 inches. (You can do it.  Think about how long you have had that panel...)

Border strips to trim the panel:

     Cut into four strips at 2.5 inches wide by width of fabric.

          Cut two of these at 28.5 inches for the long sides

          Cut two at 24.5 inches long for the top and bottom. 

 Here is a picture of the trimmed and bordered panel.    And, due to my rusty math skills, I had to remove the top border, trim some more off the panel and then reattach the border.  But all is well that ends well...    


The ice blocks are 8.5 inches unfinished.  They are made from half square triangles that measure 4.5 inches unfinished.

Note: any time you want to use this method for half square triangles, you take the measurement that your blocks need to be (in this case, 4.5 inches) and add 3/8ths of an inch. That means your squares will be cut at 4 7/8ths inches.  


One Ice Block, made up of four half square triangle blocks, each of them need to measure 4.5 inches square before you sew them together.  

For Each block:

Cut two white squares and two blue squares that each measure 4 & 7/8ths inches square. 

Note: You need 44 blocks for the Polar Ice Quilt.  That means you need to cut 88 blue squares and 88 white squares in pairs of 2 of each color.  It takes 2 blue and 2 white squares to make one block.  I used 4 different white fabrics and 7 different blue fabrics. 


On the wrong side of each white square, draw a diagonal line down the middle as pictured below.


Match a white square with a blue square, right sides together, and sew, using the diagonal line as the edge of your ¼ inch seam.


Sew on each side of the line.  Then cut the triangles apart on the line.  Press open towards the blue fabric. 


Lay out a block before you sew it together so that you can make sure you have it oriented correctly.  At this point, I start pressing my seams open so there will be less bulk at the points. 

At this step I also start pinning my blocks.  Because the seams are pressed open, they are harder to match.  They do not nest against each other. 

Match these center seams and pin. 


The end diagonal seams still nest so they are a little easier to match but I still pin them. 


I did not trim my squares at any point after the initial cutting and, as you can see, it measures a perfect 8.5 inches. Just check to make sure the blocks turned out decently uniform and correct.  

Lay your blocks out and arrange how you like.  I chose to arrange mine from light in the upper left hand corner to dark in the lower right hand corner. 

In the diagram below, the blocks are randomly placed. 


* To finish the quilt top, I added 2 inch borders.  They are cut at 2.5 inches wide.  Two strips joined together and trimmed to 64.5 inch lengths for each side.  I joined a light strip and a dark strip for the left side, joining them on a 90 degree angel, as you would for binding strips. The right side got a solid dark strip. 

* For the top and bottom, cut your borders 60.5 inches long, joining strips to achieve this length.  The top strip was again a combination of a light and dark strip joined on a 90 degree angle.  The bottom received a dark strip. 


Cutting Chart

Piece

Size

Number to cut

Ice blocks- blue squares

4 7/8ths inch squares

88

Ice blocks- white squares

4 7/8ths inch squares

88

Panel

20.5 inches wide by 28.5 inches long

1

Panel border sides

2.5 inches wide by 28.5 inches

2

Panel Border top/Bottom

2.5 inches by 24.5 inches

2

*Outer Border sides

2.5 by 64.5 inches

2

*Outer Border Top/Bottom

2.5 by 60.5 inches

2

*- please see border notes above


If you prefer to have a printable PDF of this pattern, you can find it at my Etsy shop for $2.00  https://www.etsy.com/shop/AndraAndIvy

Thanks so much for following!  Happy Quilting to all!

Sunday, January 1, 2023

2022 in Review


Here are my finishes and some of the projects I worked on in 2022.  So many things not pictured though, that are in process.  Had to include my two babies as well.  So proud of what they have accomplished in 2022 and continue working on for 2023!

Ringing in the New Year with a nice, quiet, day at home with the love of my life!  We will hit 28 years married later this year.  And of course, I will squeeze in some sewing as well!

Best Wishes to all  in 2023!

Wednesday, December 28, 2022

 Wow!  What a December!  

We kicked off the Christmas season with a road trip to Fort Worth for my daughter's audition with the Fort Worth Opera.  We have yet to hear from them.

But, we loved the afternoon & evening we spent downtown...


She's feeling a bit giddy here after her audition has completed.  

While we were off galivanting across Texas, my son up and moved to Hawaii (ok, so he has been planning to do so for about a year).  He is working on becoming a Helicopter pilot and the school there is one of the best and one of the FEW that work with federal student loans.  He is having a marvelous adventure and meeting students from all over the world!  He plans on being home by Christmas next year!  


He sends me awful pictures like the one above...


I did finally manage to get some Christmas decorations up about a week before Christmas.  Usually they go up the day after Thanksgiving around here.  


And, I finally got to spend some time sewing the last couple of days.  Yes, and eating too.   Even got a workout in this morning, the first in almost a month.  

Yes, this is the Bonnie Hunter Mystery.  I am on step number 5, having skipped number 4 since we don't really need it yet.  Want to get these blocks put together so I feel I have accomplished something.  I also want to see what those loose triangles are going to be used for.  I prefer to use the half square triangle method when I can.  Loose triangles are so hard to work with.  

Trying to get organized for the new year this morning.  The to do list just keeps getting longer so I am going to throw in the towel, go shower, and start sewing.  Oh, yeah, an hour of cleaning is on my list too.  Happy End of 2022 to all!

Saturday, November 12, 2022

Special Pillow


A friend brought me a shirt her mother had embroidered for her years and years ago.  She said she would never wear the shirt again but wanted to preserve the three special kitty embroideries from her mother's hands.  I combined them with some ivory to match the bedding in the room where she will use the pillow.  I think it came out beautifully.  

The flange is awesome!  I am not sure I will ever do a pillow without one ever again!  

Thursday, October 27, 2022

Simple Star


I am always thrilled with how simple and beautiful a basic 12 inch star block is.  It always makes me want to do an entire quilt.  

These will be used for a Christmas themed quilt I am working on but they are so beautiful, I thought I would share it with you.  Such an easy pattern for any quilting ability level.  

The center square measures 6.5 inches. 

I was tempted to use this as a foundation for a bunch of gold and yellow strings but opted for a simple solid yellow for the entire star.  

You will need to cut 4 corner squares of the blue 3.5 inches.  

The star points are a flying geese unit.  Blue 3.5 X 6.5 with Yellow squares cut at 3.5 inches, then mark the diagonal and sew.  


You end up with 4 lovely flying geese units.


Sew two of these to the opposite sides of the center square, making sure you sew through the cross point.  Then sew the blue corners to the opposite ends of the two left over flying geese units.  Then assemble.  


One width of fabric of my blue gave me all I needed for one block.  


Hope you enjoy sewing this lovely star if you choose to do so.  I would love to see what you make!  


Here is a peek at another new project I started.  It is from my husband's old jeans, my stash of ribbon, and machine embroidery- Design from Sweet Pea.  It will end up being a tote bag someday.  I only make a block or two a day and I need 16 before I can start assembling it.  And it has to take its turn with about 100 other projects....


Happy October!

Friday, May 20, 2022

A recent finish for a graduate

 I completed a quilt for a graduate recently.  It was a challenge as I have been so busy and my house is a mess!

The graduate requested purple, red, and pink.  Oh, and by the way, it needs to be masculine...

I was afraid but I actually love how it turned out.  I didn't get to see him open it so I just have to hope that he loved it!  
My husband is behind there, standing on our outdoor coffee table so it is a long quilt.
Here is the back- I had no idea it would look like flowers...

Up close...
You can see it is tie dye circles.  A lovely and fun backing.  I was in a hurry so it got a simple label and a machine binding- most of my quilts do now-days.  

I took off work today because my wrist is killing me- a hold over from a tumble I took when my dog tripped me on our walk almost 2 weeks ago- combined with inventory of the library, it is not feeling good.  My lip, which I was sure was ruined forever, has healed nicely and is still only slightly numb.  I am lucky to have my two front teeth solidly in their regular place.  

Love this monster to death- and he might just be the death of me...


Happy Sewing!


Saturday, March 12, 2022

Sewing time!


It has been pretty busy around here lately with no sign of slowing down any time soon.  This morning I did some cleaning and ironing and then decided to steal some sewing time.  This is a  Leaders & Enders project that I decided needed to become a top finally- just random squares of scraps- mostly from Harry Potter fabrics.  I have it mostly stitched into rows and now will just need to join them.  It will be a nice lap size quilt.  


This is a lovely pattern I found on the Free Spirit Fabrics website.  It is called "Woodland Dreaming".  

I love the fabrics!  However, I have sworn to use my stash so I am creating this pattern with a very different look...


Here is what I have so far- try to ignore my fabric and WIPs in the back ground!  Very little progress was made today, the rest is from a couple of weeks ago at least.  I still have 2 more sections to create and some applique to do before the top will be finished.  

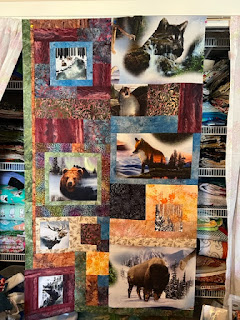
I am very happy with how it is turning out.  I think it will be a beautiful use of all my batiks, which I rarely use because they actually aren't really my preferred look even though they make lovely quilts.  Some of these batiks also belonged to my mother and I think she would love to see them in this quilt.  


Happy Saturday Sewing!

Saturday, February 5, 2022

Friday Night With Friends


I worked on some birch tree blocks.  I have seen these quilts for many years and always loved them.  I actually started a coin quilt with my scrap strings (I have 2 bins!) and realized that if I make them wider than intended for that purpose, I could make both quilts at the same time.  Of course these blocks are moving faster than the others...I have seen a tutorial of this over at Samelia's Mum.  I can't remember if that is where I saw the red version that was my favorite.  However, green goes better with my decor and my daughter also loves it so the quilt will definitely have a good home after.  I cut my blocks at 13 inches and they have trimmed down nicely to 11.5.  (Creating more strings for the bins!  They fill up faster than I can use them!)

This is my project for Friday Night with Friends from https://stitchingcubbyhole.blogspot.com/.  However, I still have a lot of sewing to do.  


In this picture, you can see my 5 X 10 inch coin blocks for my coin quilt.  They will eventually be in long columns.  And of course, you get a good view of the mess...


And, I always have multiple quilts on the go.  Those birds/flowers are for a "seed packet" quilt I have seen lately. (Exuberant Color)  I have seen it credited to multiple people but the most known is Kaffe Fossett.  My version is not Kaffe fabrics as I have none...however, I do have a ton of flower and garden themed fabrics that have sat way too long so my version will be my own unique collection and probably more fall colors with, again, lots of green.  


The blue and aqua are for a quilt I showed recently.  These are all pinned and ready to be fed quickly through the machine the next chance I get.  Which might be awhile...

Today, after a women's gathering at church, we pick up this pretty baby who has been away at boarding school for two weeks.  I have only seen him for 3 short visits during that time.  I miss him so much!  He has made such amazing progress and is definitely a different dog than the one we dropped off.  He has worked so hard and can do amazing doggy things, but all I really want to do is cuddle him!


Our sweet kitty has definitely been enjoying his time away, allowing her free range of the house.  She is much too skittish to get close to him.  I hope that will change now that he knows how to sit and stay around other animals.  She loved watching the snow storm and trying to catch the flakes by pouncing on the glass.  She also loved it last night when I cleaned the table just before dinner and placed a mat just for her- so she thought.  


I was really excited to see this visitor to my back yard a few days ago, even though he left a terrible mess.  Our entire neighborhood is overcome with pigeons and their mess is ruining my roof and patio.  I may be an evil person but I was hoping this guy would move in for good.  He stayed there and allowed me to take 4 pictures of him but when my sweet, small kitty jumped up into the window, he took off, showing an amazing and beautiful expanse of wings and taking his dinner with him.  

Monday, January 17, 2022

Ron Weasley's blanket/quilt


 I finished the Ron Weasley Blanket-inspired quilt.  Here are some up close pictures of my really awful quilting...I followed designs that I printed up from online pictures, mixed with free motion waves.  I have never been great at free motion quilting and tracing these patterns with my long arm was just as bad.  However, I am happy with the quilt.  It is going to be a great sofa quilt.


I think Ron and Harry would approve.  

I did very little crochet this weekend but am plugging along...


Blue/bright granny square will be a lap blanket.  The granny rectangle will be another lap blanket and the square is one for the Ron Weasley crochet blanket.  

Very happy to have had the long weekend to work on this quilt and have a finish.  So many more to go...